Hello! The new Stampin' Up annual catalog is about to go LIVE and I am really excited! I had to make room for the new goodies I plan to bring into my craft room, so I have many retired items FOR SALE. And they are pretty stinking cheap! I need to move them out! I would prefer to sell locally (I cannot handle a garage sale) but I will ship if required. I charge exact shipping since I have these listed at such low prices. I also have a bunch of items listed on eBay which are priced at "market rate" with little deals on postage.
Please contact me for my list and/or my eBay listings and I will HOOK YOU UP! I can also hook you up with a shiny new catalog if you are in need. :)
So many ALL CAPS! Have a great day!
Becca
Tuesday, May 30, 2017
Sunday, April 23, 2017
OnStage Display Samples! A Bonus Post, Apparently
Whoops. I neglected to post a few final cards from the samples I created! Here we go... I wanted to showcase new InColors. I had a little fling going on with Lemon Lime Twist. I kept seeing it in a very pared down design with black and white. Here, I made a diagonal panel and stamped around it with Garden in Bloom flowers and leaves. The black layer is punched with the Ticket Border Punch, also a newbie! I'm not sure why the bright hue of the Lemon Lime isn't showing right in these photos. In previous pics, it has looked right??? The white is balanced... Argh. I will chalk it up to the near-neon quality of the color and leave it at that. It's fabulous in person.

The next card is another clean and simple style. One layer focal panel on a double mat of Lemon Lime Twist and Tranquil Tide. The Lemon Lime Twist circles are created with a sponge dauber. Tranquil Tide with the circle from Work of Art, and little Powder Pink circle clusters from Perpetual Birthday Calendar. Celebrate You is from the Occasion set, Birthday Blast. Teneale Williams did a birthday card a few years ago using a similar style and it has stuck with me. So fun!

Here are some Make & Takes from OnStage. I managed to bungle the 3x3 card set using Wood Words but hopefully someone has posted a more worthy sample! :)


Thanks for taking a last look at the fun cards I made. I loved working on them!
Becca
OnStage Display Samples! A Mixed Bag
Today I am sharing the last of my OnStage display samples. (I keep typing "Stamples" - is that a thing?) I only made a few "sets" of cards and those have been shared so the rest are kind of one-off's featuring different new toys.
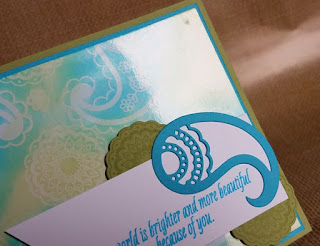
The first card I am sharing features our new (returning) Glossy Card Stock! I did some research as I have never worked with glossy cardstock personally, so I needed some ideas! I found some that I will definitely try later, but after destroying 2 full sheets with failed experiments, I settled on this Versamark resist technique. I stamped the paisleys onto the card stock with Versamark ink, then sponged Tempting Turquoise and Pear Pizzazz over it. No embossing, although that is another resist effect you can certainly do with this paper. Secret time! On the back of the Tempting Turquoise layer is another panel almost exactly like this that I realized was pretty much ruined. I hadn't been super careful and there were fingerprints and extra ghosted images of the stamps all over! Word to the wise, don't handle this with your fingers during the process! It will be a mess! An option is to make sure your fingers get clean. I keep baby wipes in my craft room for quick cleanups.

This card features the Lift Me Up bundle, along with NEW Peekaboo Peach striped grosgrain ribbon and the Ticket Border Punch. Fairly straightforward. I like the way the layers of the balloon mirror the stripes in the ribbon.

I used the fun new Corrugated Embellishments tags to make a tiny Baby banner! The stamping around the frame of the card is all Timeless Textures. I also featured the Powder Pink In Color card stock and ink.

One of my roommates made cute pillow gifts! Check it out! Anything chocolate is automatically a winner in my book.

Thanks for coming along and checking out my samples! They were really fun to make and it was an honor to be able to make them.
Becca
The first card I am sharing features our new (returning) Glossy Card Stock! I did some research as I have never worked with glossy cardstock personally, so I needed some ideas! I found some that I will definitely try later, but after destroying 2 full sheets with failed experiments, I settled on this Versamark resist technique. I stamped the paisleys onto the card stock with Versamark ink, then sponged Tempting Turquoise and Pear Pizzazz over it. No embossing, although that is another resist effect you can certainly do with this paper. Secret time! On the back of the Tempting Turquoise layer is another panel almost exactly like this that I realized was pretty much ruined. I hadn't been super careful and there were fingerprints and extra ghosted images of the stamps all over! Word to the wise, don't handle this with your fingers during the process! It will be a mess! An option is to make sure your fingers get clean. I keep baby wipes in my craft room for quick cleanups.


This card features the Lift Me Up bundle, along with NEW Peekaboo Peach striped grosgrain ribbon and the Ticket Border Punch. Fairly straightforward. I like the way the layers of the balloon mirror the stripes in the ribbon.

I used the fun new Corrugated Embellishments tags to make a tiny Baby banner! The stamping around the frame of the card is all Timeless Textures. I also featured the Powder Pink In Color card stock and ink.

One of my roommates made cute pillow gifts! Check it out! Anything chocolate is automatically a winner in my book.

Thanks for coming along and checking out my samples! They were really fun to make and it was an honor to be able to make them.
Becca
Friday, April 21, 2017
OnStage Display Samples! Pocket Full of Sunshine and Lovely Words Framelits
Welcome to another day of OnStage display samples! Today I am showing the samples I made using the Pocket Full of Sunshine stamp set and Lovely Words framelits. I am not going to lie, these ones were creativity stretchers for me! But that is okay, I figured I would get some of those when I signed on to do this gig in the first place!
Pocket Full of Sunshine is a cute set. Several fun images and I didn't understand how some of them worked until I saw the catalog samples! Anyway, here is my take on the set without the benefit of the matching dies.
First, a bright color combo featuring the new Mini Sequin Trim! When I saw the pocket, I immediately knew I wanted to create a blinged-out pocket. I could see a super shiny rhinestone-and-sequin cross or other fancy designs, but I went with a more pared-back design following the stitching lines that I stamped on the pocket. It was really easy to run the Multi Purpose liquid glue along these guides and stick the new mini sequin trim right along the lines, and gold Wink of Stella around the outside stitching. Ink spots and some gold embossing finish out the card. Love the Lemon Lime Twist background color! (And what other color to make the pocket but Dapper Denim, naturally!)

Know what? I am boring. I made another Dapper Denim pocket. This time, to play on the greeting, I popped the pocket up over the Sunburst background. Pretty straight forward, I just used Metallic Embellishments as rivets. There are multiple stitching stamps to create a design on the pocket, which is fun.

What might you put in your pocket? Sunglasses? Maybe not - if you are me, those sunglasses would be destroyed in about a minute flat. However, in the sun you would want sunglasses! Here I have showcased all 5 new In Colors. I stamped and cut them all out of the different colored card stock. The Berry Burst pair at the bottom got some shine from the Fine Tip Glue Pen. I used the Diagonal Stripe background stamp to make the strip on the left.

Lovely Words. I love them. They are really fun and I have seen other samples since I made mine that are really stellar! I think they would make very cool shakers and of course you could just cut the words and not utilize the shapes around them. I made a set of cards using all three dies and coordinating framelits. The black and white designs are all from Pop of Pink specialty designer series paper. I chose three bright colors to accent the bold backgrounds.


So the framelits cut the inside of the shape and are attached to the word, if that makes sense. I used Layering framelits in Circles, Ovals, and Sweet & Sassy hearts to cut the thinnest border possible. I used those same layer shapes to cut the white layers, and carefully glued the black cutouts over the top. The Layering dies gave me the mat layers, too. I used Brights Embellishments to add some color and shine. Way fun and very Lovely!

Those are my samples to share today! One more day should do it, I think. As usual, if you have questions about technique or materials, please ask!
Thanks for looking!
Becca
Thursday, April 20, 2017
OnStage Displays: Crafting Forever
Oh goodness. I think this one is a winner! I received Crafting Forever as one of my stamp sets to create display samples for OnStage. It's an Angel Policy set, and contains a Stampin Up copyright stamp along with loads of fun and beautiful images and phrases related to crafting. I made a set of cards and a couple of boxes using the set.
First, the pens! They are so gorgeous! They look like the sweet cloisonne enamel pens you can get in quality stationery stores. Did we all start out as stationery junkies? I used the In Color ink pads and a blender pen to color them in. I chose Powder Pink and Flirty Flamingo as the base colors for this card. I stamped the pens on white card stock, colored them, and CUT THEM ALL OUT. I colored in the gap between the pens and their clips using my Flirty Flamingo marker. I am crazy, not stupid. :) I used Wink of Stella in both clear and gold to add shine to the metal parts of the pens. To keep the edges of the pens from glowing against the pink card stock, I turned them over and ran a black marker around them. I then stamped the pens onto the Flamingo layer and glued the pens in place. I added some bling with skinny strips of silver glimmer paper and some rhinestones.


I love the little snips and the coordinating sentiment! I did NOT cut these out (so many puns...), I just stamped and colored them in. I continued the bling here with more silver glimmer paper and rhinestones as the scissor rivets! The base layer is new In Color Berry Burst.

The third card showcases the baker's twine stamp and my favorite of the sentiments! I once again stamped the image over and over on Crumb Cake and colored in the twine with Tranquil Tide. I trimmed them out, again like a crazy person. Tip, I went ahead and cut the little tails off and then very carefully cut them out separately. Not something I would recommend doing for multiples, in retrospect! Again I flipped out the cutouts and shaded the edges with a black felt marker. I paired the Tranquil Tide card stock with Early Espresso and Mint Macaron. The bling here is gold glimmer paper and metallic embellishments.

Here are all three cards together!

I also used the stamp set to make a pair of cute boxes! Both were constructed by hand. The first is a Tranquil Tide matchbox using the matching Finely Woven Ribbon and the pen image. The wrap is Foil Acetate. I also stamped the base card stock before I folded it up to make the box. I took the pattern from a YouTube tutorial by Dawn Griffith - it uses the envelope punch board and is a very slick build. The bows on both boxes were created using the 10-Second Bow Maker which I bought from Meg Daves. LOVE IT, especially for making cute little double bows!


I also made a little 3" pizza box. I just did some quick math and used my basic box-building skills to pop this one out using just my trimmer and paper snips. Side note, I think Bermuda Bay is my very favorite color ever and I LOVE this Mini Chevron ribbon! It will also be available in Crushed Curry and Old Olive. I now have my hands on all three colors and I am digging in!! The tag is cut from the Cheerful Tags dies, which carried over from the Holiday catalog (yay) and are now retiring (boo). As of now, this die set is still available at the reduced price of $15.50 US! It is wonderful for making bottle tags and I am sad to see it go.

I have to say, this group of samples makes me really happy. Lots of sweet bling and check out the Stitched Shape Framelits! I can't stop using them! The stamp set is a lot of fun and there are 2 more images that I didn't use here, a pot of paintbrushes and a wood stamp, along with the copyright stamp. I hope you enjoyed the samples! More to come... Again, if you have questions about any of the materials or techniques used, please feel free to contact me!
Thanks for looking!
Becca
Wednesday, April 19, 2017
OnStage Display Samples! Metallic Sequins and Color Theory DSP
Well, I was selected to create display samples for OnStage! This honor came with a big box of brand new goodies from the upcoming Annual Catalog... which was Absolutely Fabulous, and included lots of OOOH-worthy stuff and a few that I knew would stretch my crafty brain! But hey, that is how we come up with stuff we wouldn't necessarily have tried otherwise, so I was up to the challenge. I am not listing all of the supplies I used, so if you would like details you are certainly welcome to ask!
Today I am sharing the scrapbook page I used featuring the GORGEOUS Metallic Sequins! In the new catalog, they are listed on page 197. They are easy to miss - but don't make that mistake! This was definitely an OOOH product. The metallics are so beautiful and rich. The shine is amazing. They just ooze class and they are so fancy! I had to make a page featuring my cute daughter and the copper sequined dress she wore to prom last year. Since I had a package to play with at my leisure, I chose to slather them on! Not the way I would normally use and abuse embellishments. I am normally a frugal embellisher. (that's a real thing.) I had planned to put just a wide row of sequins under the photo, but once I measured everything out and realized what I had left for space, I just globbed on the Multi Purpose glue and piled them on! I like the simplicity of the layout. The Copper Foil letters and numbers coordinate perfectly and it just works for me.


I also thought the sequins would make an amazing shaker card. However, I thought it would be fun to make a shaker-looking card with filling that didn't actually move! I put adhesive all over the background of the cupcake top and stuck the sequins in place, then built up the top layer as I normally would for a shaker feature. (Adhesive sheets in the new catalog will make this super easy to do!) The white sequins have a pretty iridescent pinkish sheen to them so I paired them with the silver glimmer paper and NEW In Color Powder Pink for the scallop layer and the number 40. Generously applied splotches of Wink of Stella by whacking the glitter pen against my finger.

Let's talk about Color Theory for a minute. I had an inkling that when I opened up the paper pack and couldn't think of a whole heck of a lot to do with it that it must be part of a larger suite of products - which it definitely is! WOW, how fun! I wasted several sheets trying out paint-chip look ideas and card layers, but ultimately decided to make mini treat bags and dress the paper up that way. 6x6 paper is great for treat bags! You use a sheet and a half. It's a good stash-buster, too. There are four colors featured in this set but I used 3 to make this set of bags.
The first is a sunburst. I used one of the paint-chip style designs in Daffodil Delight (there is another with white between the graduating shades of color) as the bag base. I cut the sun from So Saffron and layered on a Daffodil Delight swirl from the Swirly Scribbles die set. The twine is Pool Party solid baker's twine, also from the new-stuff goody box. Metallic Embellishments and For You from Jar of Love finish out the card.

The next sample uses Old Olive in one of the crackle finish papers. The color felt right for a pretty pink rose! I cut it from the Rose Garden framelit in Powder Pink and Blushing Bride. I used the outline in Powder Pink and filled with Blushing Bride. Piecing this together can be a chore. I cut a piece of Powder Pink slightly larger than the rose, and covered it with Fast Fuse. I placed the outline on the base. I used Press n Seal wrap to hold the Blushing Bride pieces in place and pressed them into the outline. Then, I trimmed around the rose and made sure there was no adhesive oozing out of the sides. I did a similar trick with the leaves but only used one color, Pear Pizzazz. Can't say I want to do that again, those tight curves are tricky with the scissors! For You is cut from Shimmer White card stock using the word die from the Mini Treat Bag set. I am definitely getting my money out of those dies. The ribbon is NEW also, 1/8" Sheer Ribbon in Whisper White.

The last of the treat bags that I finished is Dapper Denim, the ombre design. I think this is my favorite print in all four colors. I had some bits and pieces lying on my work table so I put them together to make a little collage using the lighthouse from the High Tide stamp set. Those birds... I think I need to shave down some of the low areas of my stamp since it tends to get more ink on the paper than I want! The frame is cut using the Layering Squares. The words are framed with the Stitched Shapes - totally necessary, needs to be in every crafter's permanent collection!! The stars are from the Mini Treat Bag. The Natural Burlap trim is just the right earthy touch to help ground the collage.

I have a few other groups of samples to share, so please stay tuned! If you have questions on any of the projects I have shown, please feel free to contact me.
Thanks for looking!
Becca
Today I am sharing the scrapbook page I used featuring the GORGEOUS Metallic Sequins! In the new catalog, they are listed on page 197. They are easy to miss - but don't make that mistake! This was definitely an OOOH product. The metallics are so beautiful and rich. The shine is amazing. They just ooze class and they are so fancy! I had to make a page featuring my cute daughter and the copper sequined dress she wore to prom last year. Since I had a package to play with at my leisure, I chose to slather them on! Not the way I would normally use and abuse embellishments. I am normally a frugal embellisher. (that's a real thing.) I had planned to put just a wide row of sequins under the photo, but once I measured everything out and realized what I had left for space, I just globbed on the Multi Purpose glue and piled them on! I like the simplicity of the layout. The Copper Foil letters and numbers coordinate perfectly and it just works for me.


The first is a sunburst. I used one of the paint-chip style designs in Daffodil Delight (there is another with white between the graduating shades of color) as the bag base. I cut the sun from So Saffron and layered on a Daffodil Delight swirl from the Swirly Scribbles die set. The twine is Pool Party solid baker's twine, also from the new-stuff goody box. Metallic Embellishments and For You from Jar of Love finish out the card.

The next sample uses Old Olive in one of the crackle finish papers. The color felt right for a pretty pink rose! I cut it from the Rose Garden framelit in Powder Pink and Blushing Bride. I used the outline in Powder Pink and filled with Blushing Bride. Piecing this together can be a chore. I cut a piece of Powder Pink slightly larger than the rose, and covered it with Fast Fuse. I placed the outline on the base. I used Press n Seal wrap to hold the Blushing Bride pieces in place and pressed them into the outline. Then, I trimmed around the rose and made sure there was no adhesive oozing out of the sides. I did a similar trick with the leaves but only used one color, Pear Pizzazz. Can't say I want to do that again, those tight curves are tricky with the scissors! For You is cut from Shimmer White card stock using the word die from the Mini Treat Bag set. I am definitely getting my money out of those dies. The ribbon is NEW also, 1/8" Sheer Ribbon in Whisper White.


I have a few other groups of samples to share, so please stay tuned! If you have questions on any of the projects I have shown, please feel free to contact me.
Thanks for looking!
Becca
Thursday, January 5, 2017
OnStage Bound!
Hello! It's been a WHILE! I am heading to the Minneapolis OnStage event for Stampin' Up in April with my two best SU pals! I am really excited - I cannot wait. SU offers the opportunity for demonstrators to be display stampers for their events, and this is my application! We are to post 3 cards, 2 3-D items, and a scrapbook page showcasing our best work. Here are my submissions!

I love this. I think every single one of us has been affected by breast cancer in some way. The sequin-trim-as-ribbon is a blingy way to show support. I used shimmer white stock for the Hope die cut and watercolored it in stages, building up the Blushing Bride ombre effect.


I love the idea of an entire card front as a shaker. The Cupcakes & Carousels DSP Stack features a lot of really great patterns in a range of colors, including the ray-effect sheet I used here. Happy Birthday is stamped directly onto the acetate window sheet using StazOn black ink. The filler is Sprinkles Embellishments and vellum stars cut from the Confetti Stars punch. The top of the cupcake is accented with Wink of Stella on the darkest stamped layer.

Wisteria Wonder and silver! I love this embossing folder so much. I am a big fan of the tone-on-tone layers featured here, with the embossed piece narrowly matted by the card base. I actually love all of my embossing folders, and I am guilty of overlooking them and only thinking to use them after I have already assembled a project! I also love the bits and pieces included in the Cheerful Tags die set. I am thrilled that it carried over and is still available!

I created this family "established" sign for my stepson and daughter in law. I have 3 stepsons, and I had made one for another of the boys and his wife when they were married this past fall. Now I am catching up! The colors reflect the purple, teal, and canary colors used during their wedding. The letters and numbers are an investment, but they are so worth it! The photo doesn't show it well, but a So Saffron border is stamped around the edge of the white panel using the flourish from Timeless Textures.

Who doesn't love "The Very Hungry Caterpillar"? I made my own using the Curvy Keepsakes dies. I used 3 shades of green - Cucumber Crush, Emerald Envy, and Garden Green. The greens are stamped with the Work of Art stamp set in matching ink colors, plus the swish from Sheltering Tree in Smoky Slate, to make the cool painted look of the caterpillar in the books. I was surprised that Smoky Slate didn't show up gray at all - just a richer shade of the card stock color beneath.


I used small strips of card stock to attach the boxes together. I cut 9 green boxes and one red. This would be a fun way to serve treats at a kid's theme birthday party, and they wouldn't need to be attached.

I am not really a scrapper by nature. I love the concept, and I have made several books, but rarely do I create them for myself. I usually make special memory projects for others, like when my mom turned 50 and the year my grandmother turned 80! This page uses the Oh So Succulent products from the Occasions catalog and features photos of my granddaughter Harper on a visit to my mother-in-law's home. She has a huge bed of hens & chicks in her front yard and they are so much fun. (I think I will get a lot of use out of this succulent bundle - the art is WOW!)
I had a lot of fun stretching myself to come up with some fun projects! Thanks for visiting, and have a great day!
Becca
Subscribe to:
Posts (Atom)