Welcome to another day of OnStage display samples! Today I am showing the samples I made using the Pocket Full of Sunshine stamp set and Lovely Words framelits. I am not going to lie, these ones were creativity stretchers for me! But that is okay, I figured I would get some of those when I signed on to do this gig in the first place!
Pocket Full of Sunshine is a cute set. Several fun images and I didn't understand how some of them worked until I saw the catalog samples! Anyway, here is my take on the set without the benefit of the matching dies.
First, a bright color combo featuring the new Mini Sequin Trim! When I saw the pocket, I immediately knew I wanted to create a blinged-out pocket. I could see a super shiny rhinestone-and-sequin cross or other fancy designs, but I went with a more pared-back design following the stitching lines that I stamped on the pocket. It was really easy to run the Multi Purpose liquid glue along these guides and stick the new mini sequin trim right along the lines, and gold Wink of Stella around the outside stitching. Ink spots and some gold embossing finish out the card. Love the Lemon Lime Twist background color! (And what other color to make the pocket but Dapper Denim, naturally!)
Know what? I am boring. I made another Dapper Denim pocket. This time, to play on the greeting, I popped the pocket up over the Sunburst background. Pretty straight forward, I just used Metallic Embellishments as rivets. There are multiple stitching stamps to create a design on the pocket, which is fun.
What might you put in your pocket? Sunglasses? Maybe not - if you are me, those sunglasses would be destroyed in about a minute flat. However, in the sun you would want sunglasses! Here I have showcased all 5 new In Colors. I stamped and cut them all out of the different colored card stock. The Berry Burst pair at the bottom got some shine from the Fine Tip Glue Pen. I used the Diagonal Stripe background stamp to make the strip on the left.
Lovely Words. I love them. They are really fun and I have seen other samples since I made mine that are really stellar! I think they would make very cool shakers and of course you could just cut the words and not utilize the shapes around them. I made a set of cards using all three dies and coordinating framelits. The black and white designs are all from Pop of Pink specialty designer series paper. I chose three bright colors to accent the bold backgrounds.
So the framelits cut the inside of the shape and are attached to the word, if that makes sense. I used Layering framelits in Circles, Ovals, and Sweet & Sassy hearts to cut the thinnest border possible. I used those same layer shapes to cut the white layers, and carefully glued the black cutouts over the top. The Layering dies gave me the mat layers, too. I used Brights Embellishments to add some color and shine. Way fun and very Lovely!
Those are my samples to share today! One more day should do it, I think. As usual, if you have questions about technique or materials, please ask!
Thanks for looking!
Becca
Showing posts with label 3D. Show all posts
Friday, April 21, 2017
Thursday, April 20, 2017
OnStage Displays: Crafting Forever
Oh goodness. I think this one is a winner! I received Crafting Forever as one of my stamp sets to create display samples for OnStage. It's an Angel Policy set, and contains a Stampin Up copyright stamp along with loads of fun and beautiful images and phrases related to crafting. I made a set of cards and a couple of boxes using the set.
First, the pens! They are so gorgeous! They look like the sweet cloisonne enamel pens you can get in quality stationery stores. Did we all start out as stationery junkies? I used the In Color ink pads and a blender pen to color them in. I chose Powder Pink and Flirty Flamingo as the base colors for this card. I stamped the pens on white card stock, colored them, and CUT THEM ALL OUT. I colored in the gap between the pens and their clips using my Flirty Flamingo marker. I am crazy, not stupid. :) I used Wink of Stella in both clear and gold to add shine to the metal parts of the pens. To keep the edges of the pens from glowing against the pink card stock, I turned them over and ran a black marker around them. I then stamped the pens onto the Flamingo layer and glued the pens in place. I added some bling with skinny strips of silver glimmer paper and some rhinestones.
I love the little snips and the coordinating sentiment! I did NOT cut these out (so many puns...), I just stamped and colored them in. I continued the bling here with more silver glimmer paper and rhinestones as the scissor rivets! The base layer is new In Color Berry Burst.
The third card showcases the baker's twine stamp and my favorite of the sentiments! I once again stamped the image over and over on Crumb Cake and colored in the twine with Tranquil Tide. I trimmed them out, again like a crazy person. Tip, I went ahead and cut the little tails off and then very carefully cut them out separately. Not something I would recommend doing for multiples, in retrospect! Again I flipped out the cutouts and shaded the edges with a black felt marker. I paired the Tranquil Tide card stock with Early Espresso and Mint Macaron. The bling here is gold glimmer paper and metallic embellishments.
Here are all three cards together!
I also used the stamp set to make a pair of cute boxes! Both were constructed by hand. The first is a Tranquil Tide matchbox using the matching Finely Woven Ribbon and the pen image. The wrap is Foil Acetate. I also stamped the base card stock before I folded it up to make the box. I took the pattern from a YouTube tutorial by Dawn Griffith - it uses the envelope punch board and is a very slick build. The bows on both boxes were created using the 10-Second Bow Maker which I bought from Meg Daves. LOVE IT, especially for making cute little double bows!
I also made a little 3" pizza box. I just did some quick math and used my basic box-building skills to pop this one out using just my trimmer and paper snips. Side note, I think Bermuda Bay is my very favorite color ever and I LOVE this Mini Chevron ribbon! It will also be available in Crushed Curry and Old Olive. I now have my hands on all three colors and I am digging in!! The tag is cut from the Cheerful Tags dies, which carried over from the Holiday catalog (yay) and are now retiring (boo). As of now, this die set is still available at the reduced price of $15.50 US! It is wonderful for making bottle tags and I am sad to see it go.
I have to say, this group of samples makes me really happy. Lots of sweet bling and check out the Stitched Shape Framelits! I can't stop using them! The stamp set is a lot of fun and there are 2 more images that I didn't use here, a pot of paintbrushes and a wood stamp, along with the copyright stamp. I hope you enjoyed the samples! More to come... Again, if you have questions about any of the materials or techniques used, please feel free to contact me!
Thanks for looking!
Becca
First, the pens! They are so gorgeous! They look like the sweet cloisonne enamel pens you can get in quality stationery stores. Did we all start out as stationery junkies? I used the In Color ink pads and a blender pen to color them in. I chose Powder Pink and Flirty Flamingo as the base colors for this card. I stamped the pens on white card stock, colored them, and CUT THEM ALL OUT. I colored in the gap between the pens and their clips using my Flirty Flamingo marker. I am crazy, not stupid. :) I used Wink of Stella in both clear and gold to add shine to the metal parts of the pens. To keep the edges of the pens from glowing against the pink card stock, I turned them over and ran a black marker around them. I then stamped the pens onto the Flamingo layer and glued the pens in place. I added some bling with skinny strips of silver glimmer paper and some rhinestones.
I love the little snips and the coordinating sentiment! I did NOT cut these out (so many puns...), I just stamped and colored them in. I continued the bling here with more silver glimmer paper and rhinestones as the scissor rivets! The base layer is new In Color Berry Burst.
The third card showcases the baker's twine stamp and my favorite of the sentiments! I once again stamped the image over and over on Crumb Cake and colored in the twine with Tranquil Tide. I trimmed them out, again like a crazy person. Tip, I went ahead and cut the little tails off and then very carefully cut them out separately. Not something I would recommend doing for multiples, in retrospect! Again I flipped out the cutouts and shaded the edges with a black felt marker. I paired the Tranquil Tide card stock with Early Espresso and Mint Macaron. The bling here is gold glimmer paper and metallic embellishments.
Here are all three cards together!
I also used the stamp set to make a pair of cute boxes! Both were constructed by hand. The first is a Tranquil Tide matchbox using the matching Finely Woven Ribbon and the pen image. The wrap is Foil Acetate. I also stamped the base card stock before I folded it up to make the box. I took the pattern from a YouTube tutorial by Dawn Griffith - it uses the envelope punch board and is a very slick build. The bows on both boxes were created using the 10-Second Bow Maker which I bought from Meg Daves. LOVE IT, especially for making cute little double bows!
I also made a little 3" pizza box. I just did some quick math and used my basic box-building skills to pop this one out using just my trimmer and paper snips. Side note, I think Bermuda Bay is my very favorite color ever and I LOVE this Mini Chevron ribbon! It will also be available in Crushed Curry and Old Olive. I now have my hands on all three colors and I am digging in!! The tag is cut from the Cheerful Tags dies, which carried over from the Holiday catalog (yay) and are now retiring (boo). As of now, this die set is still available at the reduced price of $15.50 US! It is wonderful for making bottle tags and I am sad to see it go.
I have to say, this group of samples makes me really happy. Lots of sweet bling and check out the Stitched Shape Framelits! I can't stop using them! The stamp set is a lot of fun and there are 2 more images that I didn't use here, a pot of paintbrushes and a wood stamp, along with the copyright stamp. I hope you enjoyed the samples! More to come... Again, if you have questions about any of the materials or techniques used, please feel free to contact me!
Thanks for looking!
Becca
Labels:
3-D,
3D,
All Occasion,
Big Shot,
CAS,
Events,
Glitter,
Sneak Peek
Thursday, January 5, 2017
OnStage Bound!
Hello! It's been a WHILE! I am heading to the Minneapolis OnStage event for Stampin' Up in April with my two best SU pals! I am really excited - I cannot wait. SU offers the opportunity for demonstrators to be display stampers for their events, and this is my application! We are to post 3 cards, 2 3-D items, and a scrapbook page showcasing our best work. Here are my submissions!
I love this. I think every single one of us has been affected by breast cancer in some way. The sequin-trim-as-ribbon is a blingy way to show support. I used shimmer white stock for the Hope die cut and watercolored it in stages, building up the Blushing Bride ombre effect.
I love the idea of an entire card front as a shaker. The Cupcakes & Carousels DSP Stack features a lot of really great patterns in a range of colors, including the ray-effect sheet I used here. Happy Birthday is stamped directly onto the acetate window sheet using StazOn black ink. The filler is Sprinkles Embellishments and vellum stars cut from the Confetti Stars punch. The top of the cupcake is accented with Wink of Stella on the darkest stamped layer.
Wisteria Wonder and silver! I love this embossing folder so much. I am a big fan of the tone-on-tone layers featured here, with the embossed piece narrowly matted by the card base. I actually love all of my embossing folders, and I am guilty of overlooking them and only thinking to use them after I have already assembled a project! I also love the bits and pieces included in the Cheerful Tags die set. I am thrilled that it carried over and is still available!
I created this family "established" sign for my stepson and daughter in law. I have 3 stepsons, and I had made one for another of the boys and his wife when they were married this past fall. Now I am catching up! The colors reflect the purple, teal, and canary colors used during their wedding. The letters and numbers are an investment, but they are so worth it! The photo doesn't show it well, but a So Saffron border is stamped around the edge of the white panel using the flourish from Timeless Textures.
Who doesn't love "The Very Hungry Caterpillar"? I made my own using the Curvy Keepsakes dies. I used 3 shades of green - Cucumber Crush, Emerald Envy, and Garden Green. The greens are stamped with the Work of Art stamp set in matching ink colors, plus the swish from Sheltering Tree in Smoky Slate, to make the cool painted look of the caterpillar in the books. I was surprised that Smoky Slate didn't show up gray at all - just a richer shade of the card stock color beneath.
I used small strips of card stock to attach the boxes together. I cut 9 green boxes and one red. This would be a fun way to serve treats at a kid's theme birthday party, and they wouldn't need to be attached.
I am not really a scrapper by nature. I love the concept, and I have made several books, but rarely do I create them for myself. I usually make special memory projects for others, like when my mom turned 50 and the year my grandmother turned 80! This page uses the Oh So Succulent products from the Occasions catalog and features photos of my granddaughter Harper on a visit to my mother-in-law's home. She has a huge bed of hens & chicks in her front yard and they are so much fun. (I think I will get a lot of use out of this succulent bundle - the art is WOW!)
I had a lot of fun stretching myself to come up with some fun projects! Thanks for visiting, and have a great day!
Becca
I love this. I think every single one of us has been affected by breast cancer in some way. The sequin-trim-as-ribbon is a blingy way to show support. I used shimmer white stock for the Hope die cut and watercolored it in stages, building up the Blushing Bride ombre effect.
I love the idea of an entire card front as a shaker. The Cupcakes & Carousels DSP Stack features a lot of really great patterns in a range of colors, including the ray-effect sheet I used here. Happy Birthday is stamped directly onto the acetate window sheet using StazOn black ink. The filler is Sprinkles Embellishments and vellum stars cut from the Confetti Stars punch. The top of the cupcake is accented with Wink of Stella on the darkest stamped layer.
Wisteria Wonder and silver! I love this embossing folder so much. I am a big fan of the tone-on-tone layers featured here, with the embossed piece narrowly matted by the card base. I actually love all of my embossing folders, and I am guilty of overlooking them and only thinking to use them after I have already assembled a project! I also love the bits and pieces included in the Cheerful Tags die set. I am thrilled that it carried over and is still available!
I created this family "established" sign for my stepson and daughter in law. I have 3 stepsons, and I had made one for another of the boys and his wife when they were married this past fall. Now I am catching up! The colors reflect the purple, teal, and canary colors used during their wedding. The letters and numbers are an investment, but they are so worth it! The photo doesn't show it well, but a So Saffron border is stamped around the edge of the white panel using the flourish from Timeless Textures.
Who doesn't love "The Very Hungry Caterpillar"? I made my own using the Curvy Keepsakes dies. I used 3 shades of green - Cucumber Crush, Emerald Envy, and Garden Green. The greens are stamped with the Work of Art stamp set in matching ink colors, plus the swish from Sheltering Tree in Smoky Slate, to make the cool painted look of the caterpillar in the books. I was surprised that Smoky Slate didn't show up gray at all - just a richer shade of the card stock color beneath.
I used small strips of card stock to attach the boxes together. I cut 9 green boxes and one red. This would be a fun way to serve treats at a kid's theme birthday party, and they wouldn't need to be attached.
I am not really a scrapper by nature. I love the concept, and I have made several books, but rarely do I create them for myself. I usually make special memory projects for others, like when my mom turned 50 and the year my grandmother turned 80! This page uses the Oh So Succulent products from the Occasions catalog and features photos of my granddaughter Harper on a visit to my mother-in-law's home. She has a huge bed of hens & chicks in her front yard and they are so much fun. (I think I will get a lot of use out of this succulent bundle - the art is WOW!)
I had a lot of fun stretching myself to come up with some fun projects! Thanks for visiting, and have a great day!
Becca
Sunday, January 22, 2012
Flirtatious "Bugle" hanging
So, I was perusing my Google Reader and came across this post. Haley's mom had made her the cutest little wall hanging. She called it a wreath but for some reason I believe a wreath has a hole in the middle. :) Anyway it grabbed me so completely I had to make one right that very minute. So I looked into her links and found a little tutorial here that uses the project as a gift card holder. The original post is where I got the idea to call these shapes bugles - don't they kind of look like the little cracker snacks?
Oh... this post is going to be photo heavy, and it's the longest one I've ever written. I'll show you what I did and tell you what I will do differently next time I make one of these cuties. OK. I made mine with Flirtatious Designer Series Paper. I am SO bad at using my stuff. I buy things thinking they are so pretty and I will make this and that and the other thing with my supplies - and then I freak out when I think about actually cutting into a great piece of paper or anything else that is consumable. I've got to get over it! Anyway this appealed to me because it isn't very big - it uses 14, 2.5" square pieces of paper. That's all. I can do that. Here is my finished project, you can see it isn't huge by any means as I am holding it in my hand:
And here is how I made it. First, I cut my 14 squares of designer paper. I determined which papers had 2 sides that I wanted to feature and which I would only use on one side. I think you can see having yellow and orange centers wasn't in the plan! Then, I started rolling. I rolled each piece around my finger to give it a little curl, shaped it into the "bugle", applied Snail adhesive, and stuck it together. Here is what I would NOT do - I flattened the tips of the cones. Leave them the way they are.
After I finished shaping and gluing the cones, I laid them out to find a pattern I liked.
I used the Large Scallop Circle Punch to make the base of this project. I marked the circle so I could ATTEMPT to use it as a guide to place the cones. Note, I said ATTEMPT. It kind of worked but not like I had expected. Anyway, I used my hot glue gun to attach the cones to my circle base in the design pattern I had laid out. (I love this tiny silicone mat - the inevitable glue drips come right off with zero effort. I got it on clearance but I bet you can find one if you look.)
And that is half of it. I tried to make sure the pieces were snugly settled next to each other but I did end up with tiny gaps, which made the final cone difficult to get into place. It's a little snug. :) Here are all the cones in place - front and back views. I went around the tips a couple of times with my glue gun to make sure they won't go anywhere.
I thought I would continue copying the inspiration piece and use a fan fold medallion as my center. That didn't work so well - first, I used a 2x12" strip, glued the ends, and realized the furthest it would spread was not far enough. It could maybe be a tall doll house lamp shade. I cut off the glued peak, cut and scored another strip, and made a bigger circle. It was way too big. And I hated it. I had my heart set on using the laser cut doily from the DSP but I didn't like it with the medallion, so I will use that for another purpose. FYI - no need to use a perfectly cut circle for the back side of a medallion!!
I was mad. I had been so careful, using the Regal Rose Brights DSP cut so the pattern would flow over the ridges instead of along them, and I had measured... but not taken into account that the whole thing would DOUBLE and I didn't need to add a full quarter inch. Live and learn, and then remember you are blonde and will probably do it again and life will go on. I had to walk away for a bit. I thought about using tissue paper and making a fluffy layer behind the doily. Hated that too. One other option - punched strips of white copy paper with my Scalloped Edge Punch, crimped, spritzed with ink, crumpled and arranged and placed... hated that, too. Sigh. THEN I remembered the doily Sizzlit I had cut a few days before. It was perfect. It fit the "theme" and since it was white, I could spritz it with markers to match the little cones.
Once I had the Pumpkin Pie doily in place, I spritzed again with matching ink. Then I punched 3 Pretty in Pink scalloped circles and stacked them so the doilies would lay into the wreath's shallow center. I stacked 2 dimensionals between each circle.
I ran hot glue around the edges of the bottom circle and set it in place. Love!!
It was so cute! However, it needed a little something - and I knew just what that would be. Butterflies, of course. I cut several using the Beautiful Wings Embosslit and arranged them around the center. I used Dazzling Details to accent the large one.
I love it. I'm going to attach a ribbon loop to the back to hang it in my Create Escape craft room. It makes me so happy! It's so girly! AND it only used a little bit of designer paper, so I didn't sweat too much cutting it up. What do you think? You can totally do this, I know it!
What I learned: don't flatten the tips, make absolutely sure the cones are flush against each other as you glue, and KNOW WHAT YOU ARE PUTTING IN THE MIDDLE! Yes, I'm making more of these. They are just too fun.
A bit of business before I go (thanks for hanging in there!) - Sale-A-Bration starts tomorrow! Get a free item from the exclusive SAB catalog for every $50 you spend, and special bonuses for hostesses - through the end of March.
Becca
Supplies used:
Designer Series Paper: Flirtatious
Card Stock: White, Pretty in Pink, Daffodil Delight, Wisteria Wonder
Ink (markers): Pretty in Pink, Melon Mambo, Daffodil Delight, Wisteria Wonder, Pumpkin Pie
Big Shot, Paper Doily Sizzlits Die, Beautiful Wings Embosslit, Large Scalloped Circle Punch
Snail, Stampin' Dimensionals, Hot Glue Gun
Oh... this post is going to be photo heavy, and it's the longest one I've ever written. I'll show you what I did and tell you what I will do differently next time I make one of these cuties. OK. I made mine with Flirtatious Designer Series Paper. I am SO bad at using my stuff. I buy things thinking they are so pretty and I will make this and that and the other thing with my supplies - and then I freak out when I think about actually cutting into a great piece of paper or anything else that is consumable. I've got to get over it! Anyway this appealed to me because it isn't very big - it uses 14, 2.5" square pieces of paper. That's all. I can do that. Here is my finished project, you can see it isn't huge by any means as I am holding it in my hand:
And here is how I made it. First, I cut my 14 squares of designer paper. I determined which papers had 2 sides that I wanted to feature and which I would only use on one side. I think you can see having yellow and orange centers wasn't in the plan! Then, I started rolling. I rolled each piece around my finger to give it a little curl, shaped it into the "bugle", applied Snail adhesive, and stuck it together. Here is what I would NOT do - I flattened the tips of the cones. Leave them the way they are.
After I finished shaping and gluing the cones, I laid them out to find a pattern I liked.
I used the Large Scallop Circle Punch to make the base of this project. I marked the circle so I could ATTEMPT to use it as a guide to place the cones. Note, I said ATTEMPT. It kind of worked but not like I had expected. Anyway, I used my hot glue gun to attach the cones to my circle base in the design pattern I had laid out. (I love this tiny silicone mat - the inevitable glue drips come right off with zero effort. I got it on clearance but I bet you can find one if you look.)
And that is half of it. I tried to make sure the pieces were snugly settled next to each other but I did end up with tiny gaps, which made the final cone difficult to get into place. It's a little snug. :) Here are all the cones in place - front and back views. I went around the tips a couple of times with my glue gun to make sure they won't go anywhere.
I thought I would continue copying the inspiration piece and use a fan fold medallion as my center. That didn't work so well - first, I used a 2x12" strip, glued the ends, and realized the furthest it would spread was not far enough. It could maybe be a tall doll house lamp shade. I cut off the glued peak, cut and scored another strip, and made a bigger circle. It was way too big. And I hated it. I had my heart set on using the laser cut doily from the DSP but I didn't like it with the medallion, so I will use that for another purpose. FYI - no need to use a perfectly cut circle for the back side of a medallion!!
I was mad. I had been so careful, using the Regal Rose Brights DSP cut so the pattern would flow over the ridges instead of along them, and I had measured... but not taken into account that the whole thing would DOUBLE and I didn't need to add a full quarter inch. Live and learn, and then remember you are blonde and will probably do it again and life will go on. I had to walk away for a bit. I thought about using tissue paper and making a fluffy layer behind the doily. Hated that too. One other option - punched strips of white copy paper with my Scalloped Edge Punch, crimped, spritzed with ink, crumpled and arranged and placed... hated that, too. Sigh. THEN I remembered the doily Sizzlit I had cut a few days before. It was perfect. It fit the "theme" and since it was white, I could spritz it with markers to match the little cones.
Once I had the Pumpkin Pie doily in place, I spritzed again with matching ink. Then I punched 3 Pretty in Pink scalloped circles and stacked them so the doilies would lay into the wreath's shallow center. I stacked 2 dimensionals between each circle.
I ran hot glue around the edges of the bottom circle and set it in place. Love!!
It was so cute! However, it needed a little something - and I knew just what that would be. Butterflies, of course. I cut several using the Beautiful Wings Embosslit and arranged them around the center. I used Dazzling Details to accent the large one.
I love it. I'm going to attach a ribbon loop to the back to hang it in my Create Escape craft room. It makes me so happy! It's so girly! AND it only used a little bit of designer paper, so I didn't sweat too much cutting it up. What do you think? You can totally do this, I know it!
What I learned: don't flatten the tips, make absolutely sure the cones are flush against each other as you glue, and KNOW WHAT YOU ARE PUTTING IN THE MIDDLE! Yes, I'm making more of these. They are just too fun.
A bit of business before I go (thanks for hanging in there!) - Sale-A-Bration starts tomorrow! Get a free item from the exclusive SAB catalog for every $50 you spend, and special bonuses for hostesses - through the end of March.
Becca
Supplies used:
Designer Series Paper: Flirtatious
Card Stock: White, Pretty in Pink, Daffodil Delight, Wisteria Wonder
Ink (markers): Pretty in Pink, Melon Mambo, Daffodil Delight, Wisteria Wonder, Pumpkin Pie
Big Shot, Paper Doily Sizzlits Die, Beautiful Wings Embosslit, Large Scalloped Circle Punch
Snail, Stampin' Dimensionals, Hot Glue Gun
Saturday, January 21, 2012
What I made for Christmas...
Since I've been MIA for so long I thought I would share the little project I made for the kids this Christmas. Money has been very tight and we decided in the interest of making sure they got something they really wanted for Christmas, we would give them cash. Well, I am not one to just fork over the bucks. I thought maybe we could do something corny like wrap up a bunch of ones in different packages, but I didn't have that kind of time or inclination. So, I made little cones to hang on the tree. Unfortunately my camera didn't want to cooperate so the pictures don't do them justice, but you will get the idea, I hope. I used the Petal Cone Die, Pinecones and Poinsettias set, and Tiny Tags to create something special.
I embossed the filigree stamp using Champagne Versamark ink (non-SU) and clear embossing powder. It turned out darker than regular Versamark and gave some sparkle to the design. I made 4 of these, so I ran the Big Shot many times to cut the layers. 2 Kraft, 2 white, 4 Real Red. I measured and cut smaller pieces to get the smaller white and red parts without a bunch of waste. I layered these all the way around the cone, all 4 sides. The red scalloped edge was left intact on the front and back, but on the sides I trimmed them down so I could adhere the flaps down with Stampin' Dimensionals. I only glittered the front, using Champagne Glass Glitter. I did embellish the sides and used the back to write names. On the sides (BAD CAMERA!), I stamped the little holly image in Real Red and Wild Wasabi onto white cardstock, coated with a sponge dauber dipped in Champagne Shimmer Paint, and punched it out with a 1/2" circle. It was cute, I promise! The pinecone was colored and stamped with markers - Early Espresso, Wild Wasabi, Real Red. I stamped the Christmas banner in Espresso and trimmed it out. The Merry sentiment is from the Tiny Tags set and I used half of a white banner from the cone die cut, embellished with a tiny silver brad, curved with a bone folder, and glued into place. I had some ivory ribbon in my stash, which I secured with 3 glue dots on each side.
To keep the cones from jumping off the tree, I weighed them down with some M&M's. I folded the money in half and put it in a 3x3 envelope, then put that into the cone. Gosh, my kids love getting cash for Christmas!
Since I had such a horrible time getting a decent pic, here are a couple of "alternates" just for fun in sepia and black & white! :)

Thanks for looking! I will do my best to share some more fun stuff soon. I have been stockpiling. :)
Becca
Supplies used:
Stamp sets: Pinecones & Poinsettias, Tiny Tags
Ink: Versamark Champagne, Early Espresso, Real Red, Wild Wasabi
Other: Petal Cone Die, 1/2" Circle Punch, Paper Snips, Clear Embossing Powder, Champagne Shimmer Paint, Champagne Glass Glitter, Silver Mini Brads, Stampin' Dimensionals, Sticky Strip
I embossed the filigree stamp using Champagne Versamark ink (non-SU) and clear embossing powder. It turned out darker than regular Versamark and gave some sparkle to the design. I made 4 of these, so I ran the Big Shot many times to cut the layers. 2 Kraft, 2 white, 4 Real Red. I measured and cut smaller pieces to get the smaller white and red parts without a bunch of waste. I layered these all the way around the cone, all 4 sides. The red scalloped edge was left intact on the front and back, but on the sides I trimmed them down so I could adhere the flaps down with Stampin' Dimensionals. I only glittered the front, using Champagne Glass Glitter. I did embellish the sides and used the back to write names. On the sides (BAD CAMERA!), I stamped the little holly image in Real Red and Wild Wasabi onto white cardstock, coated with a sponge dauber dipped in Champagne Shimmer Paint, and punched it out with a 1/2" circle. It was cute, I promise! The pinecone was colored and stamped with markers - Early Espresso, Wild Wasabi, Real Red. I stamped the Christmas banner in Espresso and trimmed it out. The Merry sentiment is from the Tiny Tags set and I used half of a white banner from the cone die cut, embellished with a tiny silver brad, curved with a bone folder, and glued into place. I had some ivory ribbon in my stash, which I secured with 3 glue dots on each side.
To keep the cones from jumping off the tree, I weighed them down with some M&M's. I folded the money in half and put it in a 3x3 envelope, then put that into the cone. Gosh, my kids love getting cash for Christmas!
Since I had such a horrible time getting a decent pic, here are a couple of "alternates" just for fun in sepia and black & white! :)
Becca
Supplies used:
Stamp sets: Pinecones & Poinsettias, Tiny Tags
Ink: Versamark Champagne, Early Espresso, Real Red, Wild Wasabi
Other: Petal Cone Die, 1/2" Circle Punch, Paper Snips, Clear Embossing Powder, Champagne Shimmer Paint, Champagne Glass Glitter, Silver Mini Brads, Stampin' Dimensionals, Sticky Strip
Saturday, August 6, 2011
One of those FOREVER projects
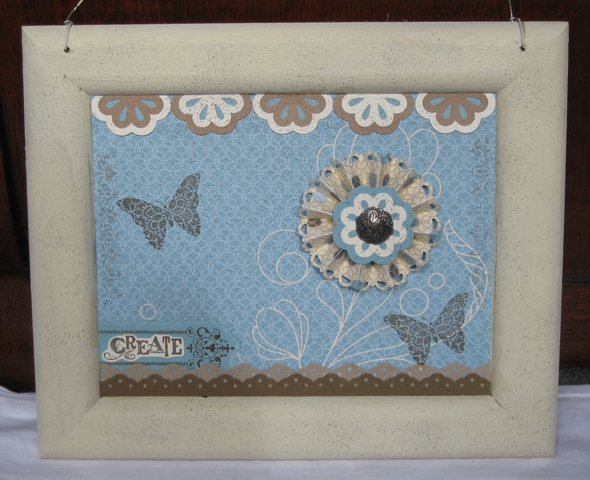
Have you ever had one of those projects that you visualized in your head, it was AMAZING, and then when you went to put it together, something went wrong and it all just stalled out? Well, this is my most recent one. I had the gorgeous background done, the top border, and a selection of cute rosettes. Some were assembled, some weren't quite done, some were glittered and beaded and... and... and... well, it wasn't finished. None of them really worked, and something was just... missing every time I went to try and finish it. That was a couple of months ago. Turns out, it was just waiting for the right stamps to come along. Here is my finally finished wall hanging.
It's going in my craft room. I love it! I got the unfinished frame for a dollar. It was one of those things that I found for cheap in the kids' craft section, all one piece so a masterpiece could just be pasted into it. Does that make sense? So, I just put my stuff ON it, I didn't have to create the piece and stuff it into the back. This did present a small challenge as I didn't measure the opening quite right and ended up having to glue in an extra strip at the top. It doesn't bother me any more, but it really bugged me when it happened. I painted the whole frame with ivory acrylic paint and mod-podged the designer paper to it. Did you know they make SPARKLE mod podge??? It's awesome. I painted over the whole Elegant Soiree DSP panel with it. Then I used my color spritzer tool to sprinkle everything with Early Espresso and Basic Gray markers, followed by a shot of Vanilla Smooch Spritz. It was sprinkly and sparkly and beautiful. I punched out the top border using the Blossom Bouquet Triple Layer Punch, and Very Vanilla, Baja Breeze (if you can't see it, I used the full shape, filling in the backs of the flowers), and I can't really tell what that light brown is... it's been a while and it doesn't look like the current neutrals. Sigh. Once the flowers were punched, I laid them out on scrap paper and spritzed them with Early Espresso as well.
I cut the blossoms in half and adhered them across the top. Then, I was stuck. I tried placing all the different rosettes I had made, but none of them looked quite right. Just... blah. I did assemble the center blossom with the cute Antique Brad at the same time as the border flowers. And it all sat. UNTIL TODAY. I was inspired. One of the first new sets I had marked in the new catalog was Creative Elements. Which cracked me up because I am usually grabbed first by the Elements section of the catalog, and I could instantly see a zillion projects and cards that I knew I would make once I had it in my hot little hands! So, how does that rosette look as the flower on the printed "stem"? I used the Elegant Soiree DSP, edged with the Scallop Trim Border Punch, scored between each scallop.
I borrowed the Eyelet Border Punch from a friend and punched a border from textured Soft Suede card stock. I laid it on the frame and got goosebumps - PERFECT! So I cut another border from Crumb Cake textured card stock (I love this stuff), offset and glued them together, and spritzed them with Early Espresso. A note here. I did this twice. The first time, I also sprayed the assembled border with Log Cabin Smooch Spritz. I did use scrap paper behind it, but did you know: 1. that stuff sprays a LOT, and 2. it's not exciting to clean it out of the carpet when you don't think to put the to-be-sprayed item in a box first? Such is my life. Anyway! It was perfect for the space without the Log Cabin... all for the better, I guess - for me, if not for the carpet. Don't tell my husband.
I had already adhered the eyelet border in place when I decided butterflies were in order. And the Create corner. There's a little overlap but who's looking? Seriously, quit looking. I am so glad I thought to use the new stamp set. It works so well with this!! I had some Baja Breeze textured card stock that I just knew would be AMAZING, layered behind (of course, behind) the border with the Create legend fussy cut from Very Vanilla card stock on top. I used Soft Suede ink for all the stamping.
I also took the finial border from the set and stamped it in Soft Suede - stamped off once before I added it to the frame, since the butterflies were full strength and it would have been too much if I hadn't. Like that run-on sentence? As you can see, I had a little ink get on the frame but that doesn't really bother me at all. I was kind of squeezing it in as this was the last element added to the piece, and I had to work around the rosette on the other side as well. It was a tight fit, but it worked. Thank goodness for acrylic blocks, since I would never have been able to make this work with a wood block stamp.
I love it. It makes me smile. I am SO GLAD I decided to finish it. Really, I was cleaning up the mess in my living room when I came across it, and I couldn't just move it as it was. ADD, anyone? Hmmm.... So, here is the finished project once again. What do you think??
All stamping supplies Stampin' Up:
Stamp Set: Creative Elements
Ink: Soft Suede
Markers: Early Espresso, Basic Gray, Baja Breeze
Card Stock: Baja Breeze (smooth and textured), Soft Suede textured, Crumb Cake textured, Very Vanilla, old mystery brown...
Designer Series Paper: Elegant Soiree
Punches, Tools, Etc: Blossom Bouquet Triple Layer, Eyelet Border, Scallop Trim Border, Color Spritzer, Antique Brads, cheap-o frame, acrylic paint, matte & sparkle Mod Podge
So happy to complete another UFO!! (UnFinished Object!)
Becca
It's going in my craft room. I love it! I got the unfinished frame for a dollar. It was one of those things that I found for cheap in the kids' craft section, all one piece so a masterpiece could just be pasted into it. Does that make sense? So, I just put my stuff ON it, I didn't have to create the piece and stuff it into the back. This did present a small challenge as I didn't measure the opening quite right and ended up having to glue in an extra strip at the top. It doesn't bother me any more, but it really bugged me when it happened. I painted the whole frame with ivory acrylic paint and mod-podged the designer paper to it. Did you know they make SPARKLE mod podge??? It's awesome. I painted over the whole Elegant Soiree DSP panel with it. Then I used my color spritzer tool to sprinkle everything with Early Espresso and Basic Gray markers, followed by a shot of Vanilla Smooch Spritz. It was sprinkly and sparkly and beautiful. I punched out the top border using the Blossom Bouquet Triple Layer Punch, and Very Vanilla, Baja Breeze (if you can't see it, I used the full shape, filling in the backs of the flowers), and I can't really tell what that light brown is... it's been a while and it doesn't look like the current neutrals. Sigh. Once the flowers were punched, I laid them out on scrap paper and spritzed them with Early Espresso as well.
I cut the blossoms in half and adhered them across the top. Then, I was stuck. I tried placing all the different rosettes I had made, but none of them looked quite right. Just... blah. I did assemble the center blossom with the cute Antique Brad at the same time as the border flowers. And it all sat. UNTIL TODAY. I was inspired. One of the first new sets I had marked in the new catalog was Creative Elements. Which cracked me up because I am usually grabbed first by the Elements section of the catalog, and I could instantly see a zillion projects and cards that I knew I would make once I had it in my hot little hands! So, how does that rosette look as the flower on the printed "stem"? I used the Elegant Soiree DSP, edged with the Scallop Trim Border Punch, scored between each scallop.
I borrowed the Eyelet Border Punch from a friend and punched a border from textured Soft Suede card stock. I laid it on the frame and got goosebumps - PERFECT! So I cut another border from Crumb Cake textured card stock (I love this stuff), offset and glued them together, and spritzed them with Early Espresso. A note here. I did this twice. The first time, I also sprayed the assembled border with Log Cabin Smooch Spritz. I did use scrap paper behind it, but did you know: 1. that stuff sprays a LOT, and 2. it's not exciting to clean it out of the carpet when you don't think to put the to-be-sprayed item in a box first? Such is my life. Anyway! It was perfect for the space without the Log Cabin... all for the better, I guess - for me, if not for the carpet. Don't tell my husband.
I had already adhered the eyelet border in place when I decided butterflies were in order. And the Create corner. There's a little overlap but who's looking? Seriously, quit looking. I am so glad I thought to use the new stamp set. It works so well with this!! I had some Baja Breeze textured card stock that I just knew would be AMAZING, layered behind (of course, behind) the border with the Create legend fussy cut from Very Vanilla card stock on top. I used Soft Suede ink for all the stamping.
I also took the finial border from the set and stamped it in Soft Suede - stamped off once before I added it to the frame, since the butterflies were full strength and it would have been too much if I hadn't. Like that run-on sentence? As you can see, I had a little ink get on the frame but that doesn't really bother me at all. I was kind of squeezing it in as this was the last element added to the piece, and I had to work around the rosette on the other side as well. It was a tight fit, but it worked. Thank goodness for acrylic blocks, since I would never have been able to make this work with a wood block stamp.
I love it. It makes me smile. I am SO GLAD I decided to finish it. Really, I was cleaning up the mess in my living room when I came across it, and I couldn't just move it as it was. ADD, anyone? Hmmm.... So, here is the finished project once again. What do you think??
All stamping supplies Stampin' Up:
Stamp Set: Creative Elements
Ink: Soft Suede
Markers: Early Espresso, Basic Gray, Baja Breeze
Card Stock: Baja Breeze (smooth and textured), Soft Suede textured, Crumb Cake textured, Very Vanilla, old mystery brown...
Designer Series Paper: Elegant Soiree
Punches, Tools, Etc: Blossom Bouquet Triple Layer, Eyelet Border, Scallop Trim Border, Color Spritzer, Antique Brads, cheap-o frame, acrylic paint, matte & sparkle Mod Podge
So happy to complete another UFO!! (UnFinished Object!)
Becca
Subscribe to:
Posts (Atom)